As it turns out you just might be wearing the wrong bra size. The telltale signs are probably there but sometimes finding the right size is a lot harder said than done. If you are fed up with ready to wear bras not fitting or wearing out too quickly and want some control over your undergarments then you’re in the right place. This article is going to take a deep dive into how to DIY bra measurements.
This post contains affiliate links. When you click and make a purchase from these links, we might get a commission. It doesn’t cost you anything extra!
How to DIY Bra Measurements
There are a few methods of measuring for your bra size. You can literally do it all by yourself or you can ask for the help of a trusted friend or companion. Basically to measure for your correct bra size you will need to calculate three measurements:
- Band Size
- Bust Measurement
- Cup Size
Let’s go into further detail – DIY bra measurements:
What are your bra size concerns now?
You are probably about to sew your first bra and you want to make sure you get the right measurement. You may follow this guide and get numbers that are completely different from what you have been buying for years. You’re not crazy. If you have experienced any of the following issues then you are wearing the wrong size. We can fix that together!
Issue #1: The band is riding up in the back
What this means: There are two reasons why your band with ride up in the back. One is that the band is too big. If this is the case then you need to start by going down by one band size. The second reason is that you have your straps too tight and it is lifting the band up in the back. Loosen the straps then see where the band lies. If it is still riding up then it’s time to change your band size.
Issue #2: Wrinkling cups
What this means: If your cups are wrinkling right off the bat then your bra is too big. If over time they started wrinkling then your cups were probably too small and the weight of your breasts have stretched them out over time. Either way, you are wearing the wrong size.
Issue #3: Straps falling off on their own
What this means: Bra straps should be worn comfortably. So comfortably that you should never notice them throughout your day. If you find that your straps are constantly falling even after adjustments then your bra cups are probably too big. When your bra cups are too big your breasts cannot properly fill them out and hold them up causing your straps to fall down as well. This can happen over time if you are wearing the wrong size. Your cups could have stretched to a bigger size due to wear or your straps may have stretched out as well. The quality of fabric also adds an element to how much weight the bra can bear.
Issue #4: Straps that are too tight
What this means: Have you ever felt your straps digging into your shoulders? It’s an unpleasant feeling right? If you have adjusted your bra straps to the tightest point and now you are in pain because of the weight bearing down on your shoulders then you are wearing the wrong cup size. Your cups are likely too big and your straps are trying to do all the work. Adjust to a smaller cup size that allow your breasts to fill them out properly and hold them up.
Issue #5: Underwire poking the sides of your breasts
What this means: Are you familiar with the feeling of a round tip wire digging into the side of your breasts? Not a fun experience. This happens when your underwire is too small for your frame. This can be a common issue for teenage girls who are still developing. One day their bra fits just great then over time that underwire starts poking at them without warning. Either way, it is time to move up a cup size.
Issue #6: Underwire poking your arm
What this means: If your underwire is poking or grazing against your inner arm instead then it is too big. You need to size down your cup and possibly your band size because your underwire is too large for your frame. It is important to take your height into account when looking for the right size. Your torso may be longer or shorter which can change the way your underwire fits you.
Issue #7: Cup spillage
What this means: If your breasts are spilling out and not in the smooth cleavage sense of “spilling” then your cups are too small. You need to size up so your breast tissue comfortably sits inside the cup and holds it up smoothly.
Issue #8: Gap between your breast and the cup
What this means: If you breast tissue and your cup aren’t meeting above the apex then you could have a cup size that is too big or the bra style you are wearing just doesn’t compliment your breast shape. Try on a few bras with a smaller cup size and while you are at it try on a demi style bra. A demi style bra does not have fabric near the very top of the cup which allows the tissue to sit at the base of the cup and pushes the rest of the tissue up for fullness.
Issue #9: Strap and band pop out in the back
What this means: If your strap and band pop out away from your body then your bra is definitely too big. Either the size is too big or your bra fabric is stretched beyond recovery. If it is not stretched and is just too big then you may need to size the band down as long as the breasts fit comfortably in the cups. If not, then both the band and cup need to size down.
Issue #10: Bulging Cups
What this means: This is common with padded bras as their shape warps over time with lots or wear and wash. Your size could be just fine if your don’t meet any of the other issues while wearing it. You probably just need to retire this bra and move onto a new favorite.
Issue #11: Bulging in the back
What this means: If you notice your back is bulging out over your bra band then your bra is likely too small. You need to move to the next band size for a smoother more comfortable fit. This will ease pressure on your back and remove the pain of fabric and elastic constantly digging into your skin.
Issue #12: Clasping your band on the tightest notch
What this means: If you are clasping your band on the tightest notch from the very first wear then your band is probably too big. When you purchase a bra it should fit comfortably when the band is clasped on the first notch. This way as your fabric stretches and recovery weakens you can move onto the next clasp until you are at the tightest clasp. Once this clasp is too tight then it is time to replace your bra.
Now certain life circumstances can temporarily affect your bra size so don’t rush to your lingerie drawer and start throwing everything out if you experience any of the issues above.
If you have recently experienced the following or are currently experiencing the following listed below then take pause, show yourself some grace. Once things are back to normal than head on back and take your measurements.
- Pregnancy
- Nursing
- Weight gain
- Weight loss
- New Exercise routine
- New diet
- Surgery
What you will need to DIY bra measurements:
- Measuring tape (you can also use a long strong or ribbon then measure it against a ruler)
- Non-padded bra – if you opt to not go bra less
- Mirror
- Optional: A friend, spouse, companion, or anyone you are comfortable with seeing you in a bra.
Step by Step Measuring Instructions – DIY bra measurements:
How to take your band measurement
Technique 1:
The band component is connected to the frame of the bra and wraps around the body then fastens in the back. The band is sometimes referred to as the “wings”.
Step 1: To measure the band make sure you are wearing an unpadded bra or are bra less. Your bra band sits just under your bust. This would be considered your torso.
Step 2: Head over to your mirror
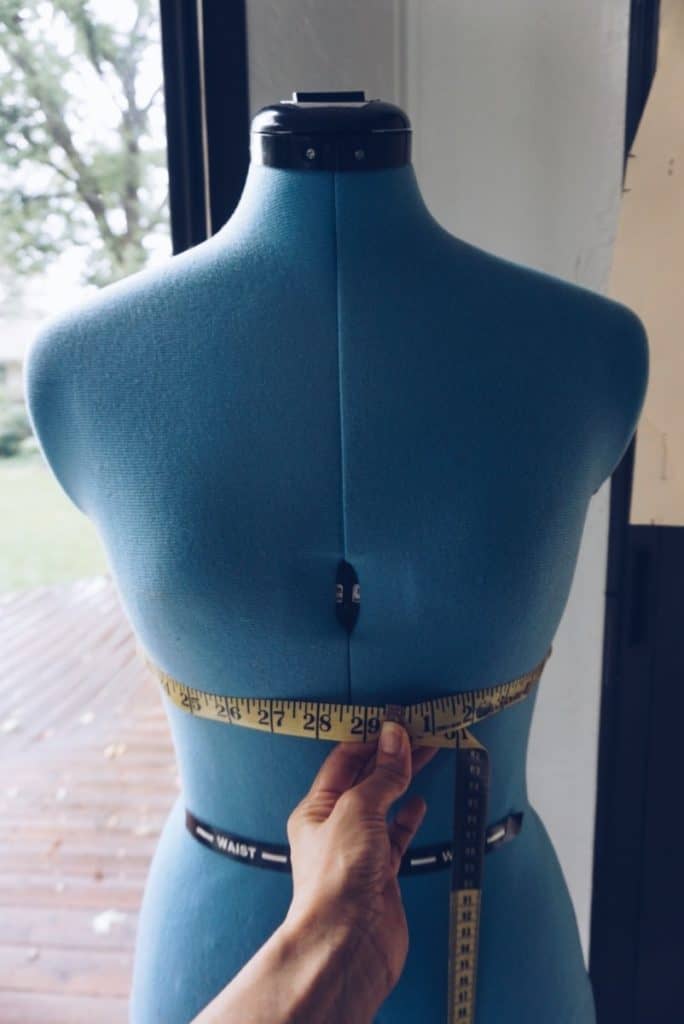
Step 3: Standing straight but comfortably, take your measuring tape and measure around the perimeter of your torso just under your bust.

Step 4: Expel any air that is in your lungs. Because your band expands with your lungs you want to make sure you measure at your smallest circumference aka when your lungs are no longer expanded after you release a full breath.
Step 5: Make sure your measuring tape is parallel to the ground and snug around your torso for the most accurate measurement.
Step 6: Record this number then round to the nearest whole number.
- For example: If you measure at 32 ⅜” then the nearest whole number is 32”, conversely if you measure at 32 ¾” then the nearest whole number is 33”.
- If your number is even – add 4 inches.
- If your number is odd – add 5 inches.
How to take your bust measurement:
While still facing your mirror.
Step 1: Stand up straight with your arms to your side (if you have a helper – do your best if you are doing it yourself).
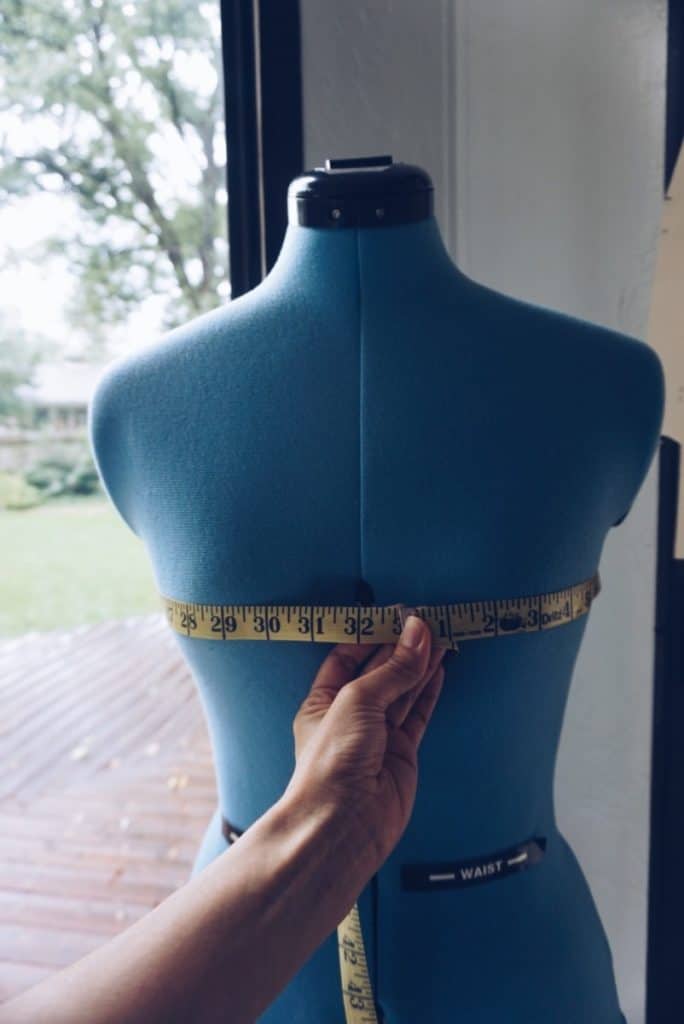
Step 2: Take your measuring tape and wrap around the fullest part of your breast. This should be the apex of the breast or the nipple.

Step 3: Do not wrap the measuring tape tightly. Make sure it is slightly loose but not falling down and the measuring tape is still parallel to the ground.
Step 4: Record this number then round to the nearest whole number.
Determine your cup size:
The bra cup holds the breast in place and shapes the breast tissue. There are a variety of cup designs that can be made with soft or firm fabric. Bra cups designs can have seams or be seamless. They can also be supported by underwire.
To get the correct cup size you need to subtract the band measurement from the bust measurement. This number corresponds with a specific cup size. For example, an A cup would be a 1” difference while a D cup would be a 4” difference. Refer to the following chart to find your correct cup size.
Cup Size Chart:
| Band Measurement minus Bust Measurement | Suggested Cup Size |
| ½” | AA |
| 1” | A |
| 2” | B |
| 3” | C |
| 4” | D |
| 5” | DD/E |
| 6” | DDD/F |
| 7” | DDDD/G |
| 8” | H |
| 9” | I |
| 10” | J |
| 11” | K |
| 12” | L |
| 13” | M |
| 14” | N |
| 15” | O |
Technique 2:
I learned this technique from the Bare Essentials Bra book by Jennifer Lynne Matthews-Fairbanks. I really like this technique and feel it is more precise for my body type. Give it a try and see if your numbers end up differently between this technique and the first technique suggested above.
This is an excerpt from her book which you can purchase through this affiliate link:
- Take a snug measurement under your bust. (This would be more accurate without wearing a bra, but take the remaining measurements wearing a bra).
- The chest measurement is taken over the breast tissue. This measurement should also be snug.
- If you add your two measurements together and divide by two, that will give your band size in US/UK band sizing.
- Take your bust measurement across the widest point on your bust.

Step 1 
Step 2 
Step 4
Write this down and fill it out:
| Chest Measurement: | |
| Under Bust Measurement: | |
| Average (Band Size): | |
| Bust Measurement: | |
| Ready-to-wear Bra Size: |
Using your Band Size and your Bust Measurement refer to this table:
This is exactly the same table you will find in Bare Essentials on page 22. I only went up to bust measurement and band measurement of 42”.
continued…
| Bust Measurement |
| Band Size | 36 | 37 | 38 | 39 | 40 | 41 | 42 |
| 28 | H | I | J | K | L | ||
| 30 | F | G | H | I | J | K | L |
| 32 | D | E | F | G | H | I | J |
| 34 | B | C | D | E | F | G | H |
| 36 | AA | A | B | C | D | E | F |
| 38 | AAA | AA | A | B | C | D | |
| 40 | AAA | AA | A | B | |||
| 42 | AAA | AA |
| Bust Measurement |
| Band Size | 29 | 30 | 31 | 32 | 33 | 34 | 35 |
| 28 | A | B | C | D | E | F | G |
| 30 | AA | A | B | C | D | E | |
| 32 | AAA | AA | A | B | C | ||
| 34 | AAA | AA | A | ||||
| 36 | AAA |
Good Practices for Fitting Your Bra:
While you are sewing up your new bra try the following to make sure that you are on the right track for the correct size.
First and foremost, sew up a muslin bra first to get the fit just right. It will save you time and money on materials. Then you can use this muslin moving forward to reference for correct measurements and sizing when sewing any new bra pattern.
Now that you have made your muslin try these fitting tricks to get it just right:
- Try on your bra while bending slightly forward at the waist. Make sure your breasts are completely in the cups. If they are too snug or loose then you need to correct the size.
- Make sure your band is parallel to the ground just the same way your measuring tape was parallel to the ground when you were taking your measurements. If it is riding up your back then it is too big. If it is sagging then your cups may be too big.
- Is your bra loose? Make sure you can slip one finger between you and the band comfortably while still hooking the bra at the first notch.
- Are your straps falling? If so, tighten the straps. If that doesn’t work figure out where your muslin is loose and tighten that area then go back to the straps.
- Take a look at the overall picture of the fit of your muslin. If you see anything that looks unflattering figure out what the issue is with the Issue List above and adjust accordingly.
Now that you know how to measure yourself take a look at the list below for some great patterns to get your started.
Bra Patterns To Try:
Marlborough Bra by Orange Lingerie
- Description: This popular bra pattern is a full frame underwire bra for everyday use. It is meant to have superior support while maintaining a flattering shape and comfort. This pattern lends itself well to experimenting with different fabrics for a custom design.
- Level: Advanced
- Sizes: A-DD, DDD-JJ
- Format: PDF Download
Boylston Bra by Orange Lingerie
- Description: This popular bra pattern is a full frame underwire bra for everyday use. It features a demi cup that can be lined with cut and sew foam. It is intended to provide supportive comfort while allowing the bra maker the versatility of experimenting with prints and color.
- Level: Advanced
- Sizes: A-DD, DDD-JJ
- Format: PDF Download
Classic Full Band Bra by Pin Up Girls
- Description: This is a great supportive bra that can be made with or without an underwire. It also features wider straps for more comfort especially for a larger bust size. This bra is meant to be made with low-stretch fabrics that add to the supportive structure.
- Level: Advanced
- Sizes: Available in over 90 sizes – 30-38 AAA-D, 30-38 E-H, 40-48 A-D, 40-48 E-H
- Format: Paper
Amethyst Lace Bra by Pin Up Girls
- Description: This is a full band bra that can be made with or without underwires. The cup is split into 4 pieces with a narrower upper cup for superior lift. You can sew this bra with or without a foam lining but be sure to choose fabrics accordingly. The cups and band of this pattern are interchangeable with the Ruby Full Band Bra from Pin Up Girls as well.
- Level: Advanced
- Sizes: 100 unique bra sizes
- Format: Paper
Ruby Full Band Bra by Pin Up Girls
- Description: This is a full band bra that can be made with or without underwires. The cup is split into 4 pieces with a narrower upper cup for superior lift. You can sew this bra with or without a foam lining but be sure to choose fabrics accordingly. The cups and band of this pattern are interchangeable with the Amethyst Lace Bra from Pin Up Girls as well.
- Level: Advanced
- Sizes: 100 unique bra sizes
- Format: Paper
Shelley Full Band Bra by Pin Up Girls
- Description: This is a full band bra that can be made with or without underwires. The cup is designed to add extra room. This bra is meant to be made with low-stretch fabrics that add to the supportive structure.
- Level: Advanced
- Sizes: Available in 90 unique sizes – 30-38 AAA-D, 30-38 E-H, 40-48 A-D, 40-48 E-H
- Format: Paper
- Description: Ingrid is a well thought out bra pattern. It is an everyday soft cup, non-wired bra that acts as if it has an underwire. It features an integrated bridge, a Gothic Arch, a split lower cup and front and side panels that keep the breasts facing forward and separate. This bra really has it all. It also has the option of a zip front closure or hook and eye front closure to accommodate a larger bust size.
- Level: Advanced
- Sizes: Over 200 unique sizes
- Format: Paper
- Description: The Angie Bra pattern is a round cup design with vertical seams. It features a narrow band and a sloped hook and eye closure. These characteristics prevent the bra from rolling up while establishing good support and fit.
- Level: Advanced
- Sizes: 32A – 38E (70 – 85 A-E) 32F – 38I (70 – 85 F-I) 40A – 46E (90 – 105 A-E) 40F – 46I (90 – 105 F-I)
- Format: Paper – can order from Sweden or the American Distributor – Sweet Cups Bra Supply
- Description: The Jessica Bra pattern (sister pattern to Angie) is a round cup design with one vertical seam and a split front. It features a narrow band and a sloped hook and eye closure. These characteristics prevent the bra from rolling up while establishing good support and fit.
- Level: Advanced
- Sizes: 32A – 38E (70 – 85 A-E) 32F – 38I (70 – 85 F-I) 40A – 46E (90 – 105 A-E) 40F – 46I (90 – 105 F-I)
- Format: Paper – can order from Sweden or the American Distributor – Sweet Cups Bra Supply
Linda Partial Band Bra Pattern
- Description: The Linda Bra is a supportive wired bra with a partial band. This bra is meant to be made with low-stretch fabrics that add to the supportive structure.
- Level: Advanced
- Sizes: 30-38 AAA-D, 30-38 E-H, 40-48 A-D, 40-48 E-H
- Format: Paper
- Description: This is a full-figured bra that is intended for a more rounded breast shape. It is very supportive featuring underwires and the use of a low-stretch fabric.
- Level: Advanced
- Sizes: 32D-48I
- Format: Paper
Harriet Bra Pattern by Cloth Habit
- Description: The Harriet Bra is a balconette style bra designed with an underwire and a 3-piece cup seam design. It is uplifting and feminine making it a great lingerie wardrobe staple.
- Level: Advanced
- Sizes: 28-42 A-E, 28-42 E-H
- Format: PDF
Watson Bra Pattern by Cloth Habit
- Description: The Watson Bra is the perfect everyday bra. It is comfortable and easy to style. It have a deep neckline and is designed without an underwire for maximum ease.
- Level: Advanced
- Sizes: 30B-30I, 32A-32H, 34AA-34G, 36AA-36F, 38A-38E, 40A-40D
- Format: PDF
Conclusion:
The ability to determine your correct bra size is a bit of an art form. It takes practice and time to learn then your body may change and you will have to start over again. Knowing how to measure yourself is well worth the time and effort. Well-fitted undergarments can transform any outfit and make it look amazing. There are many benefits to a well fitting bra including comfort, confidence, and utility. Take the time to get your correct measurements and start sewing bras that you love.
Want to learn more about bra making? Check out these articles:
How To Find Your Underwire Size
How to Sew a Bra and Other Lingerie at Home
Love this Tutorial? Pin it for later!


