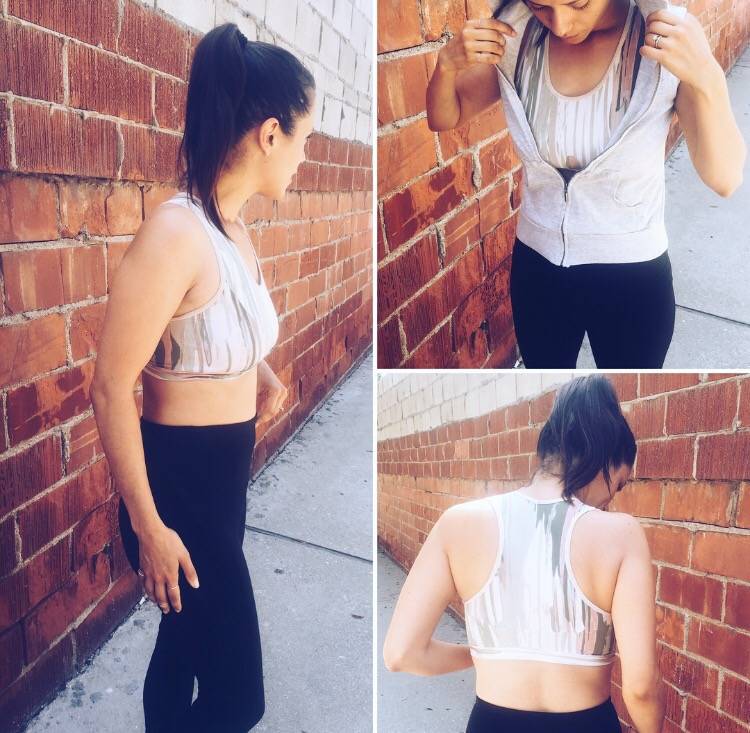
Being that I’m very into my workout routine I was ready to dive into sewing up whatever sports bra I could find! I stumbled across two patterns and both were for free. I decided to go with the Ultimate Sports Bra from So Sew Easy because it seemed to have a good amount of support and I really liked the style lines.
The Low Down:
The So Sew Easy Ultimate Sports Bra is a free pattern with a comprehensive video tutorial. You can download the pattern here. This is ONLY the pattern. Directions are not included so you have to either go read the directions here or watch the tutorial here. I highly recommend watching the tutorial and keeping that in the background as you sew. I also recommend watching the tutorial before you head to the fabric store which was something I really wish I had done.
Materials:
- 1/2 yard of Spandex/nylon 4-way stretch or lycra milliskin nylon Spandex
- 2 yards of foldover elastic to match the main fabric. Either 5/8” or 3/4” width.
- Thread to match
- #10 ball point needle
- Optional: Bra cups
Purchased from:
I purchased all of my supplies from the Los Angeles Fabric District. If any of you have been there you know you can get some great fabric for an outstanding deal. The So Sew Easy blog provides links in the materials section of their tutorial for you to easily purchase these items on Amazon.com. Otherwise, your local fabric store or favorite online shop.
The Process:
I usually prep my pattern, fabric and instructions in steps. It takes me a few days to get everything together as I don’t have big blocks of time to spend on them each day.
Day 1: Cut out paper pattern and fabric
Tip from Mayra of So Sew Easy: When pattern pieces are drafted on a fold and you are using slippery fabric always trace that pattern piece and draw the matching side so your new pattern piece is one unfolded pattern piece. This will prevent slippage issues and inadvertently cutting incorrectly. She also suggests using a rotary cutter.
To be completely honest, I didn’t do this. Not because I didn’t want to but because I cut the pattern and fabric out before I watched the video/read the tutorial. My pieces turned out just fine though.
Day 2: Watch video on my bus ride home.
Day 3:
This happened to be a Saturday and my husband was out kayak fishing so guess what I got to do?! Work on this pattern until my sewing machine and I got into an altercation… haha
I carefully watched each step of the tutorial in sequence with my sewing. I sewed the back pieces together with ease once my machine cooperated (more on that to come). Next was the front and the sides. Then you apply the facing which was my favorite step because the facing is applied to the front interior and you sew the sides to the bra but not on a seam. The outcome is the zigzag stitch appears on the right side of the sports bra giving it a RTW princess seam look.
You will also see that the facing is left unsewn where it lies on the straps. This is left open so you can add bra cups if you so choose.
Sew the shoulder seams together then measure the sleeve opening and the neckline opening with your measuring tape. Subtract 1” then measure your foldover elastic and cut. Be sure to double check this as for some reason I messed my measuring up and I’m not sure how. You will need to fold each in half lengthwise and sew the ends together at 1/4” to create a circle. Measure as directed and sew them on the openings while stretching the elastic being sure that they enclose the fabric and reach around the whole perimeter of the opening.
Day 4:
Finally, you will create a band for the bottom of the sports bra where you will be directed to measure around the opening of the bra and subtract 1”-2”. You will then draw this on a piece of large paper and create your own band pattern. Attach to the bottom of the bra and you are complete! 🙂
Hiccups:
My machine! Sometimes it really seems like it is plotting against me… Here is my frustration: I spent so much time and thread trying to get the tension just right. I am using a regular sewing machine by the way so I use a zigzag stitch for my knit projects. My machine doesn’t seem to care for a narrow zigzag stitch unless it really really feels like it. For the most part it will sew in a wavy line then skip a few stitches then just maybe do what it’s supposed to.
My machine seems to favor a wider zigzag but doesn’t like it if I switch between zigzag and straight stitch. It gets confused… Let’s just say my seam ripper should just be medically attached as a 6th finger.
I cleaned up the mess and this is how it turned out. Not bad when my machine is happy!
Recommendations:
- Watch the tutorial before you get your supplies and before you start sewing this project.
- Test your machine’s zigzag capacity on thread that you don’t mind wasting if using a regular sewing machine.
- Double check your foldover elastic and band measurements before you cut.
- If you’re anything like me you’ll need to keep that seam ripper handy. 😉

